Live Chat
Introduction:
Live Chat ကတော့ Page Messenger အစား အသုံးပြုနိုင်ပါတယ်။ Page ကို စကားလာပြောသမျှ User တွေကို Reply ပြန်ဖို့၊ သက်ဆိုင်ရာ Label တွေနဲ့ အုပ်စုခွဲထားဖို့၊ Follow Up ပြန်လိုက်ဖို့စတဲ့ Functions တွေအကုန် လုပ်ဆောင်နိုင်မယ့် နေရာတခုပဲဖြစ်ပါတယ်။
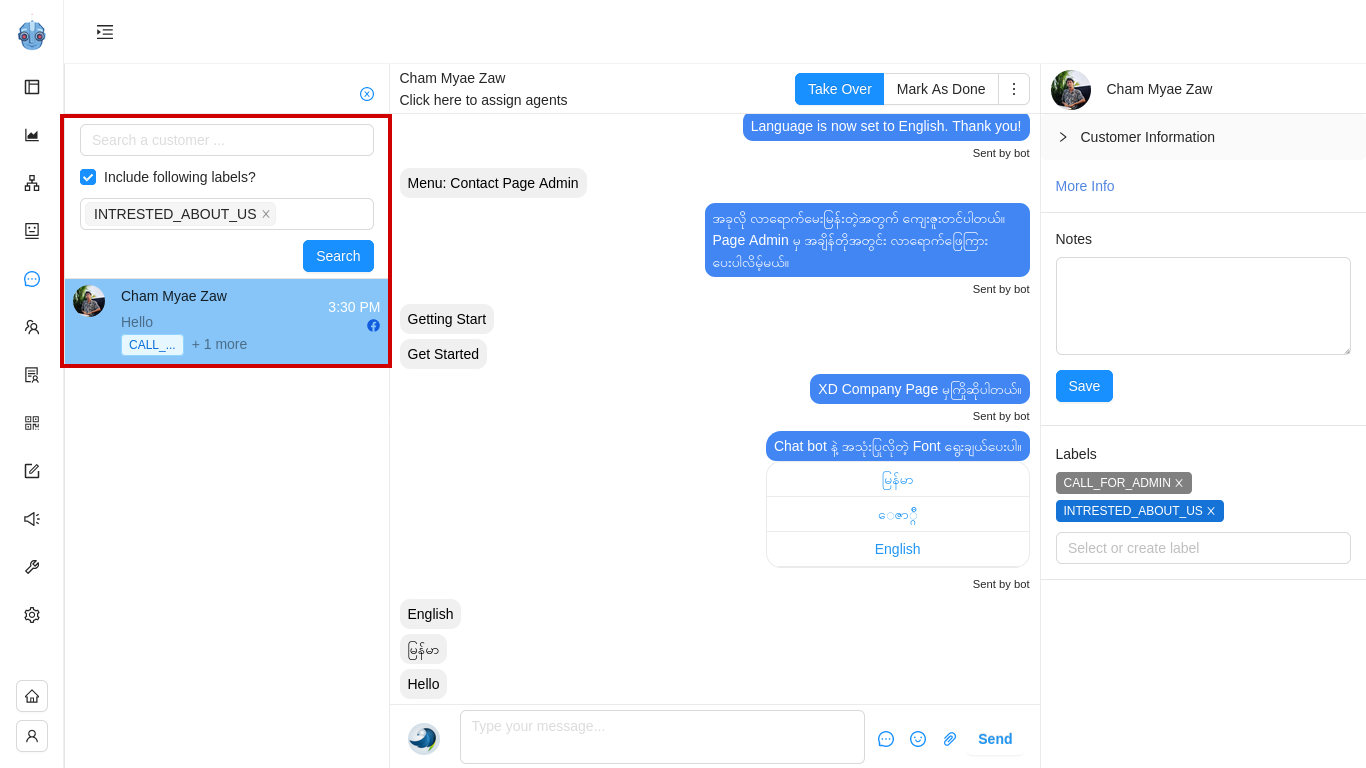
Search Box မှ Customer Name နဲ့ Label တွေကို ရှာမယ်
Search box မှာကတော့ Customer တွေကို Account Name နဲ့ရော Label Name နဲ့ပါ အချိန်မရွေးပြန်ရှာနိုင်မှာပါ။
Customer တွေ မေးထားသမျှ ဂရုတစိုက် ပြန်ဖြေဖို့၊ follow up လိုက်ဖို့ စသဖြင့် Customer Care ကောင်းကောင်းလုပ်နိုင်မယ့် UI တစ်ခုပါ။
Search ခလုတ်လေးကို နှိပ်လိုက်မယ်ဆိုရင် Search a customer နဲ့ Search a labels ဆိုပြီး ရှာလို့ရမယ့် Box လေးတွေကျလာမှာပဲဖြစ်ပါတယ်။

Customer Name နဲ့ ရှာမယ်
Customer တွေရဲ့ conversation တွေကို account name ရိုက်ပြီး ရှာနိုင်မှာပါ။ "Search a customer name" မှာ User ရဲ့ Facebook account နာမည်ကို တိတိကျကျ (သို့မဟုတ်) အစ စာလုံးနည်းနည်းပဲ ရိုက်ထည့်ရုံဖြင့် အလွယ်တကူ ရှာနိုင်ပါတယ်။

Label နဲ့ ရှာမယ်
Label နဲ့ ရှာမယ်ဆိုရင်တော့ ပုံပါအတိုင်း Labels နေရာကို select ရွေးပေးရမှာဖြစ်ပြီး create လုပ်ထားတဲ့ label နာမည်အတိုင်းတိတိကျကျ (သို့မဟုတ်) အစ စာလုံးနည်းနည်း ရိုက်ထည့်ရုံဖြင့်ရှာနိုင်မှာပါ။
" Include following labels? " ကို on ထားမယ်ဆိုရင်တော့ Customer တစ်ယောက်ထဲအတွက် သက်ဆိုင်ရာ Label တစ်ခုကိုရှာနိုင်မှာပဲဖြစ်ပါတယ်။
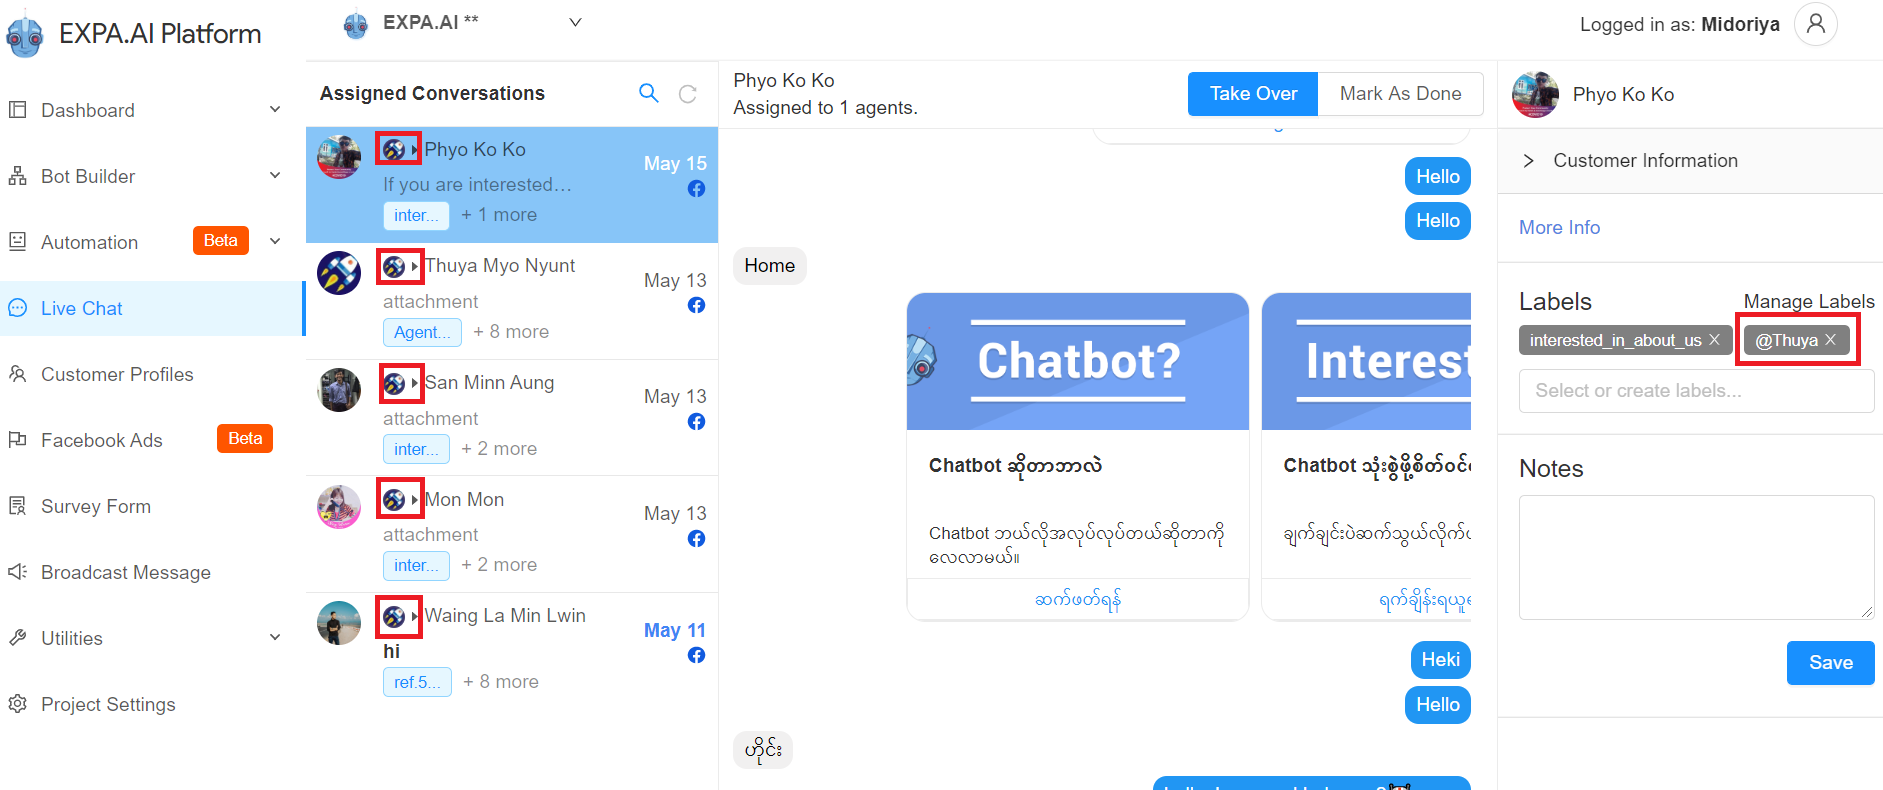
ညာဘက်က More info ရဲ့ အောက်က Labels နေရာလေးမှာတော့ Label နာမည်လေးတွေတွေ့ရမှာပါ။ အပြာရောင်လင်းနေတာလေးတွေက Dashboard ကနေ Admin or agent ဘက်က Manual တပ်ထားတဲ့ Labels တွေဖြစ်ပြီး အမဲလင်းနေတာလေးတွေကတော့ Bot Builder Flow > Advanced settings ထဲမှာပေးထားတဲ့ Auto Label တွေပဲဖြစ်ပါတယ်။
Inbox, Assigned Conversations, My Chats အသုံး၀င်ပုံ
Inbox ဆိုတာကတော့ Facebook Page Inbox လိုမျိုး User တွေမေးထားသမျှ Messages တွေ အကုန်တစ်နေရာတည်း ဖော်ပြပေးမှာဖြစ်ပါတယ်။
Inbox ကိုပဲ click တစ်ချက်ထပ်နှိပ်မယ်ဆိုရင် Assign Conversations နဲ့ Mychats ကိုပါတွေ့ရမှာဖြစ်ပါတယ်။
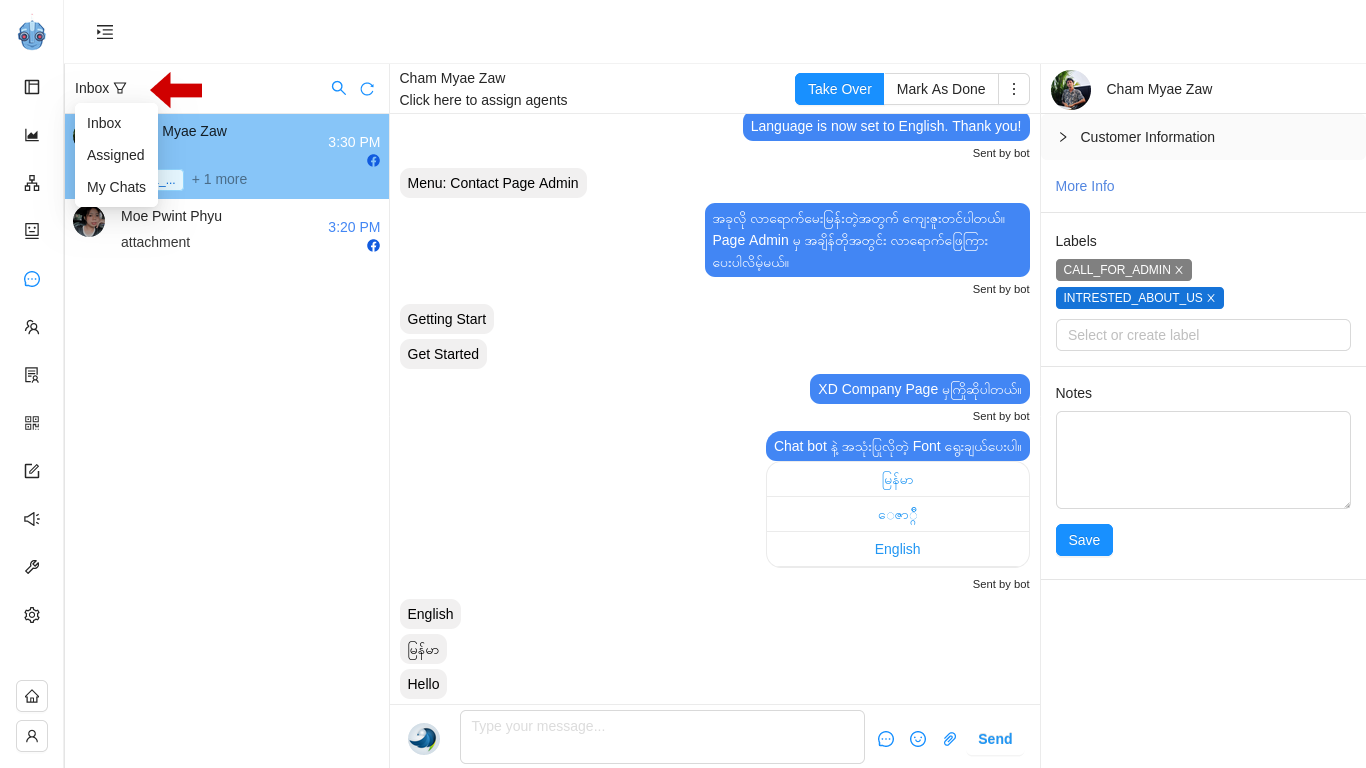
Assign Conversations ထဲမှာတော့ Page ကိုစကားလာပြောတဲ့ Users တွေထဲမှ သက်ဆိုင်ရာ Label တပ်ခံထားတဲ့ User တွေကို တစ်နေရာထဲမှာ တွေ့နိုင်မှာဖြစ်ပါတယ်။ မိမိအပါအ၀င် တခြား Agent များ အတွက် Assign လုပ်ထားတဲ့ Conversation တွေ အားလုံး တွေ့နိုင်မှာပါ။
MyChats ကတော့ မိမိတစ်ယောက်တည်းအတွက်ပဲ Assign ချထားတဲ့ User တွေရဲ့ Conversation ကိုသီးသန့်တွေ့ရမယ့်နေရာတခုဖြစ်ပါတယ်။
User အသစ်တွေလာတဲ့အခါ My Chats ထဲကနေ + Sign လေးနှိပ်ရုံဖြင့် မိမိနဲ့သက်ဆိုင်တဲ့ Conversation တခုကို Inbox နဲ့ Assign Conversation List ထဲကနေ လှမ်းယူလိုက်မှာဖြစ်ပါတယ်။
ထိုသို့လှမ်းယူလိုက်တဲ့အတွက် ဤ User က မိမိအတွက် သီးသန့် Assign ဖြစ်သွားမှာဖြစ်ပြီး တခြား Agent တွေဆီမှာ အလိုအလျောက် Assign ပြုတ်သွားပါလိမ့်မယ်။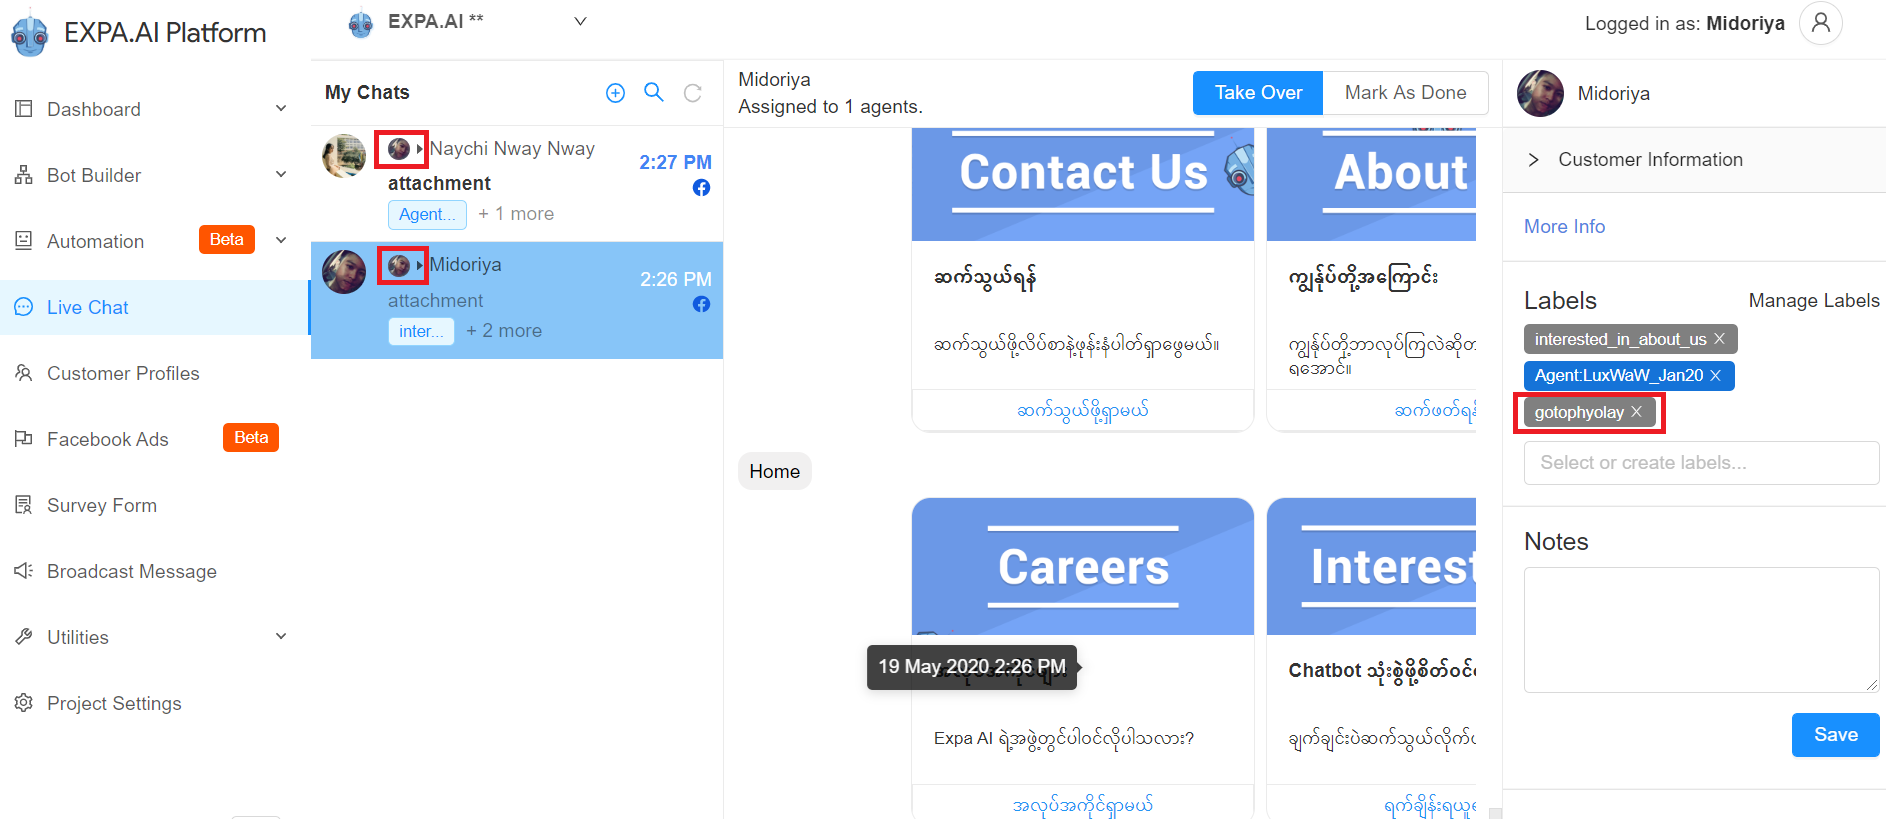
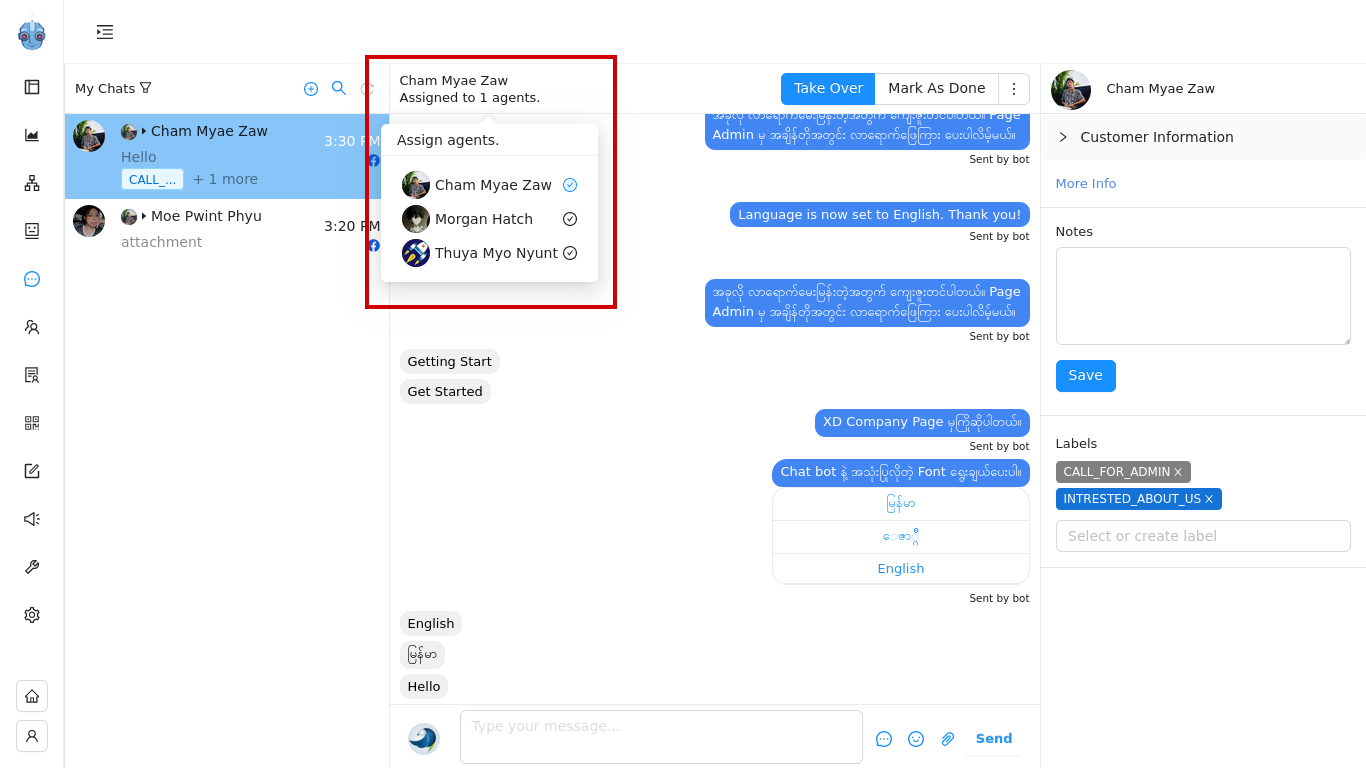
Assigned to agents လွှဲမယ်
Customer Name အောက်က Assigned to agents ခလုတ်လေးကို နှိပ်လိုက်မယ်ဆိုရင် Label Assign ချထားတဲ့ Agent ရဲ့ နာမည်မှာ အမှန်ခြစ်လေးပြနေမှာဖြစ်ပါတယ်။ Customer နဲ့ ပြောနေရင်း ကိုယ်က တခြားAgent ကို Assign လွှဲချင်တဲ့အခါ Agent Name ဘေးက အမှန်ခြစ်လေးကို Click ပီး လွှဲပေးရုံပါပဲ။ Conversation က တခြား ကိုယ်လွှဲပေးလိုက်တဲ့ Agent ရဲ့ My Chats ထဲကို ရောက်သွားမှာပဲဖြစ်ပါတယ်။
Take Over & Mask As Done အသုံးပြုခြင်း
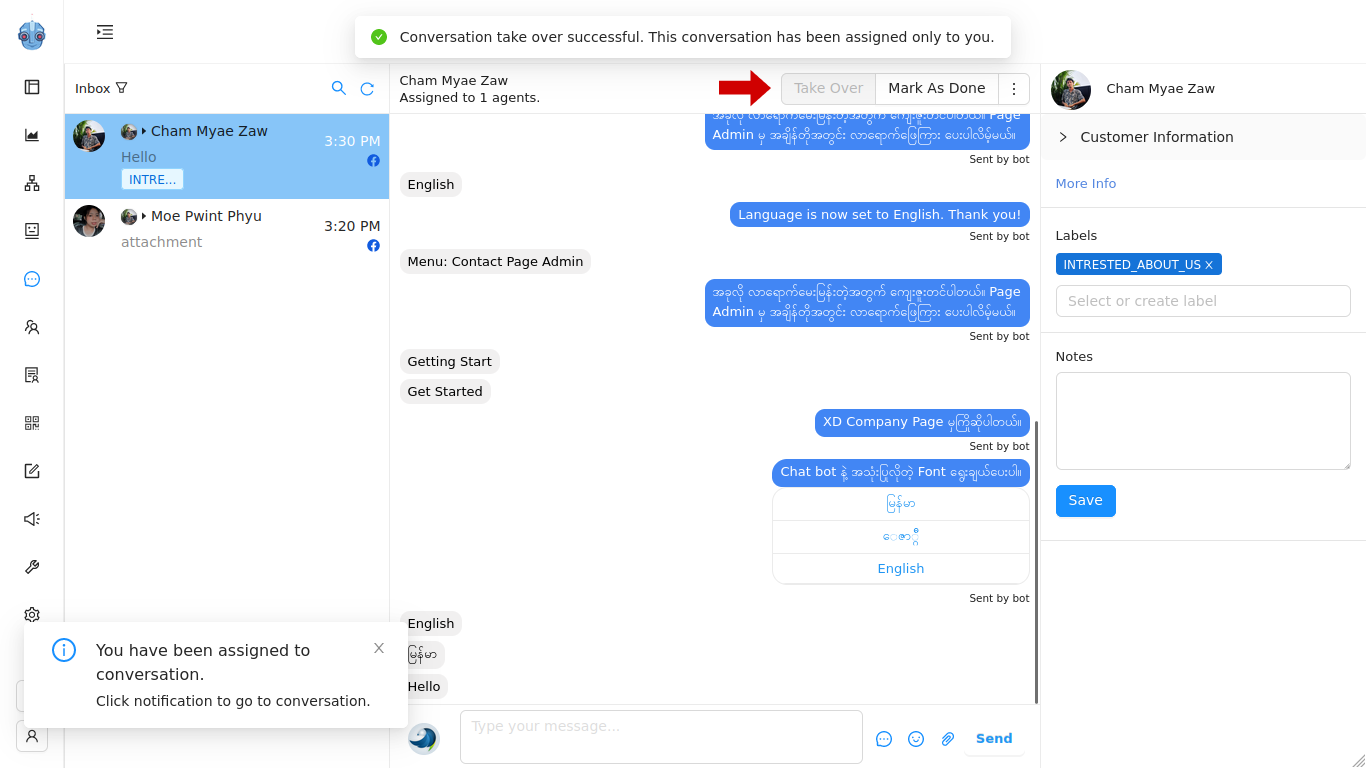
Take Over ကတော့ Inbox ထဲကဖြစ်ဖြစ် My Chat ထဲကဖြစ်ဖြစ် Customer's Conversation ကို Reply လုပ်လိုတဲ့အခါ Take Over နှိပ်ပေးရမှာပါ။
Take Over နှိပ်ပေးခြင်းဖြင့် အခြား Agent တွေဆီမှာ စကားပြောခွင့် Message Box ကိုပိတ်ပေးထားမှာဖြစ်ပြီး မိမိတစ်ယောက်တည်းပဲပြောလို့ရနိုင်အောင် Assign ချထားမှာဖြစ်ပါတယ်။
အကယ်၍ NLU AI Bot ကို သုံးထားတယ်ဆိုရင်လည်း Take Over နှိပ်ပေးခြင်းဖြင့် Admin ဝင်ရောက်ဖြေကြားရန်တွင် Bot နဲ့ လူ စာတွေရောထပ်မနေတော့ပဲ.. Bot ကို ခေတ္တ ခန ရပ်စေမှာပါ။ သက်ဆိုင်ရာ Assigned Admin ကတာ၀န် ၀င်ယူနိုင်မှာပဲဖြစ်ပါတယ်။
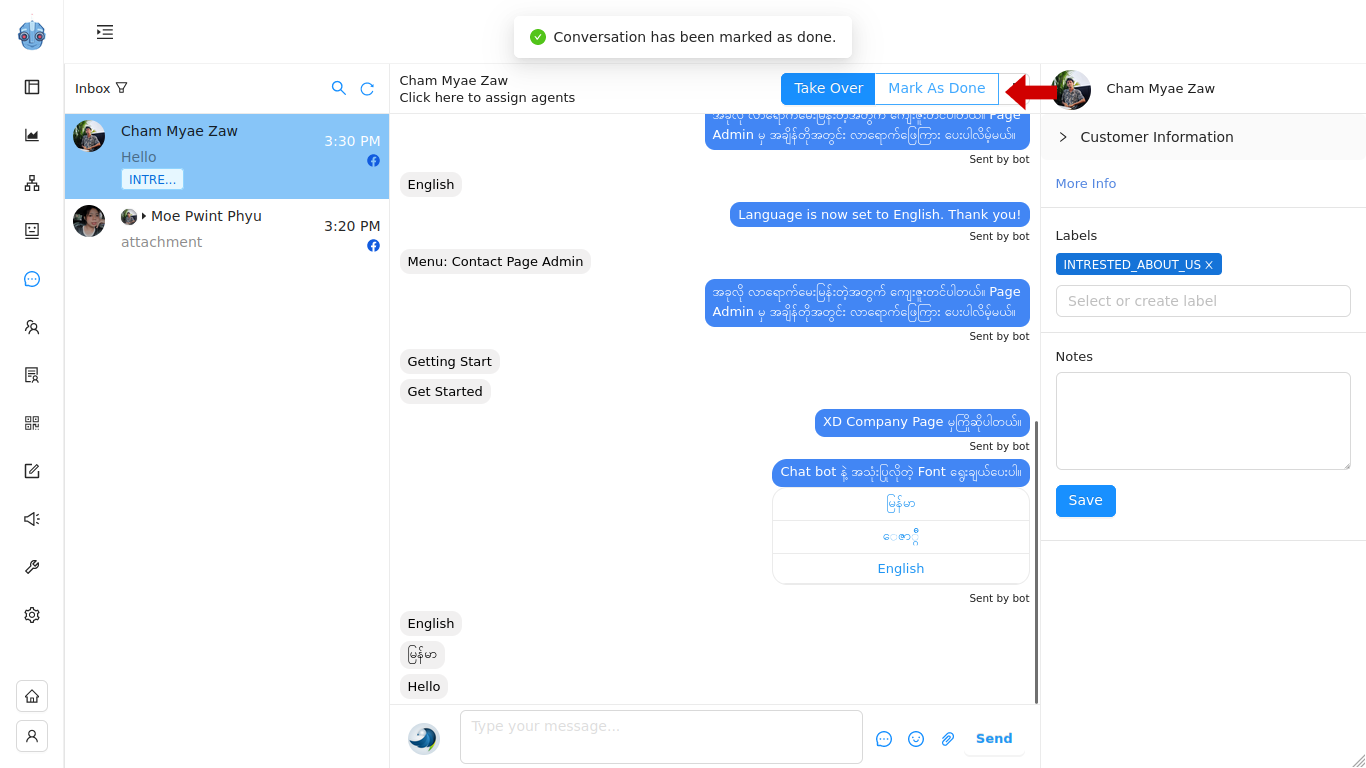
Mark As Done ကတော့ Customer နဲ့ ပြောပီးတဲ့အခါ Conversation ပီးတာသေချာပီဆိုရင် နှိပ်ပေးနိုင်ပါတယ်။ Take Over လုပ်ထားတုန်းက အခြား Agent တွေဆီမှာ Message Box ပိတ်ထားပေမယ့် Mark As Done လုပ်လိုက်တဲ့အခါ ပြန်ဖွင့်ပေးမှာပဲဖြစ်ပါတယ်။
Label ရှေ့မှာ @ Sign ခံထားရင် Mark As Done လုပ်တာနဲ့ ပြုတ်သွားမှာဖြစ်ပါတယ်။ NLU Ai Bot လည်း နဂိုအတိုင်းပြန်အလုပ်လုပ်မှာဖြစ်ပါတယ်။
Type your message မှ conversation reply ပြန်မယ်
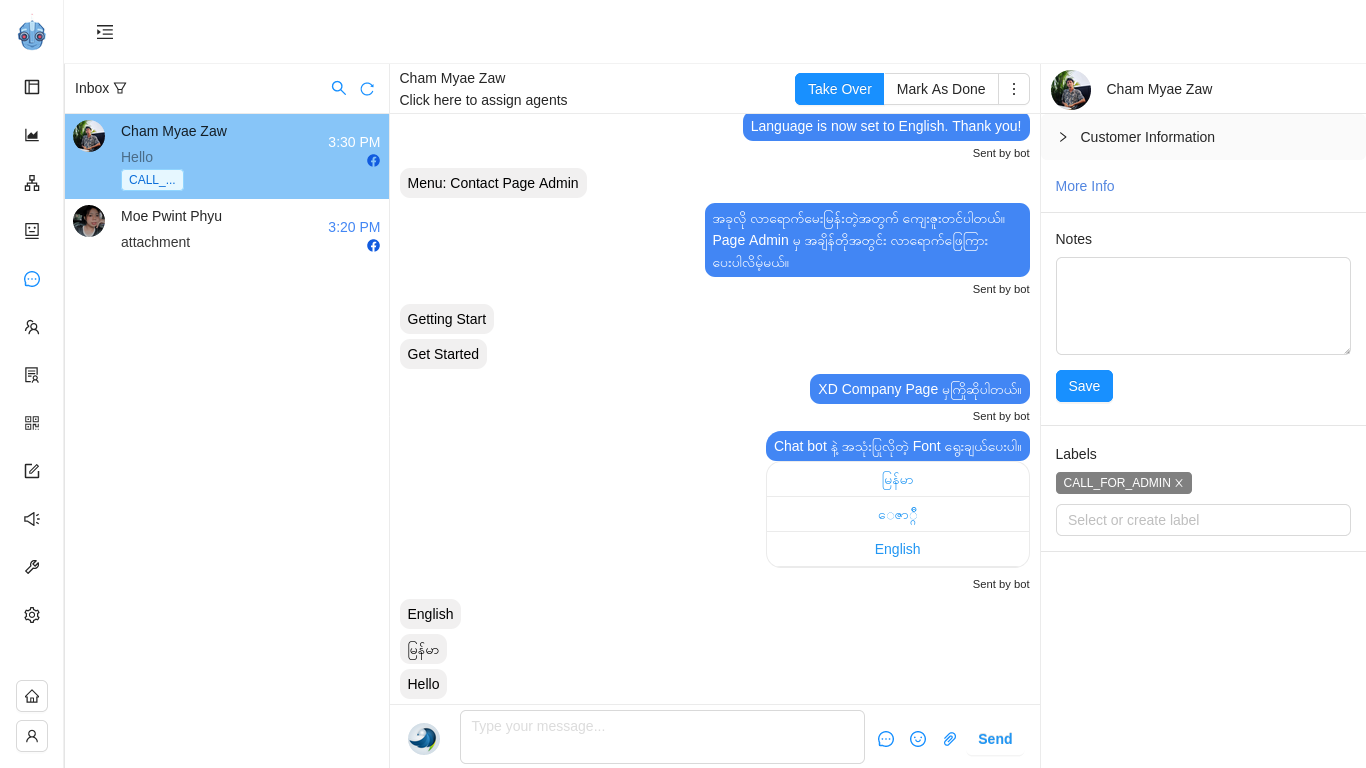
Type your message... မှာတော့ Page Inbox လိုပဲ Conversation ကို Reply လုပ်နိုင်မှာဖြစ်ပါတယ်။
Choose Bot Reply မှာတော့ Bot Builder ထဲက Action Name တွေ တွေ့ရမှာပါ။
Choose Bot Reply ဆိုတာကတော့ Bot Builder ထဲက Action Flow တစ်ခုကိုပို့ချင်တဲ့အခါ Send ခလုတ်ကိုနှိပ်ပြီး ပို့ပေးနိုင်မှာပါ။
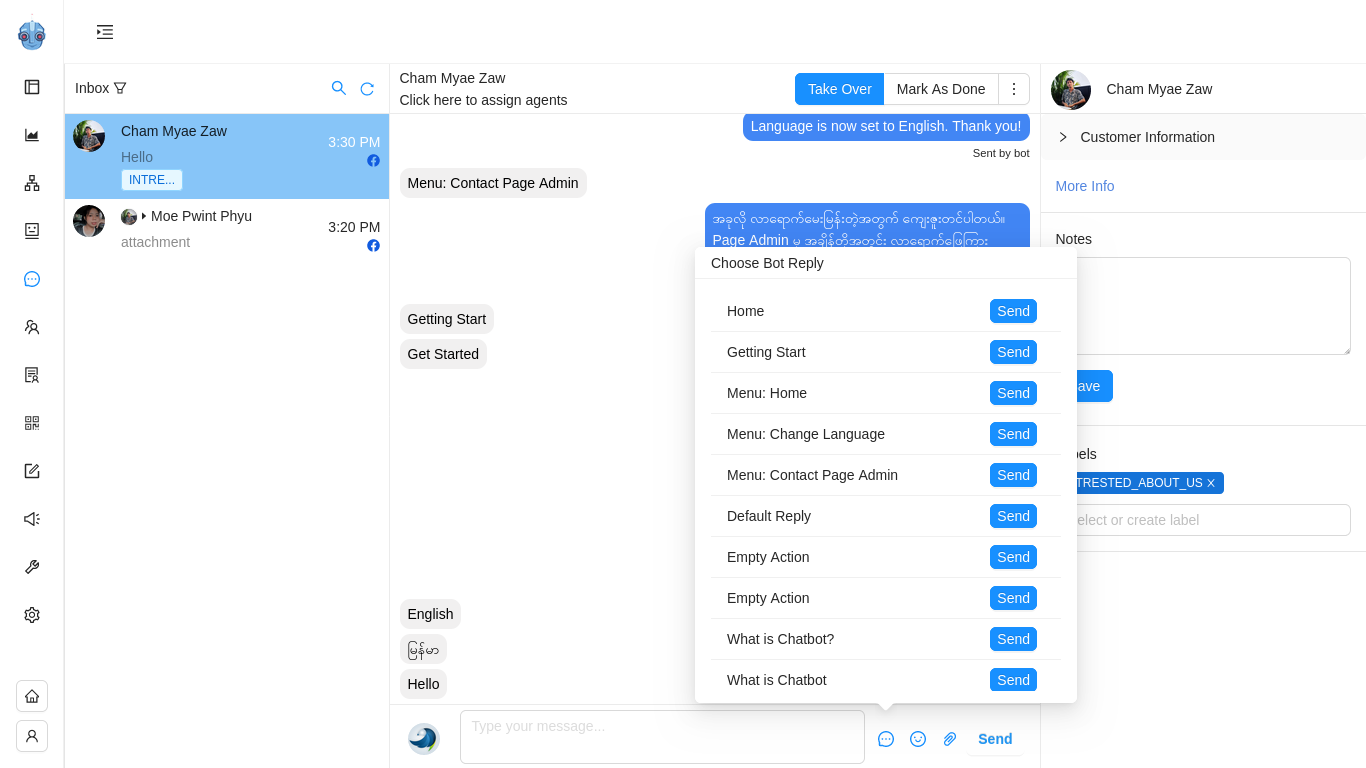
ပုံမှာ မြင်ရတာကတော့ Choose Bot Reply မှာရွေးလို့ရမယ့် Bot Builder ထဲက Action Name တွေပဲဖြစ်ပါတယ်။
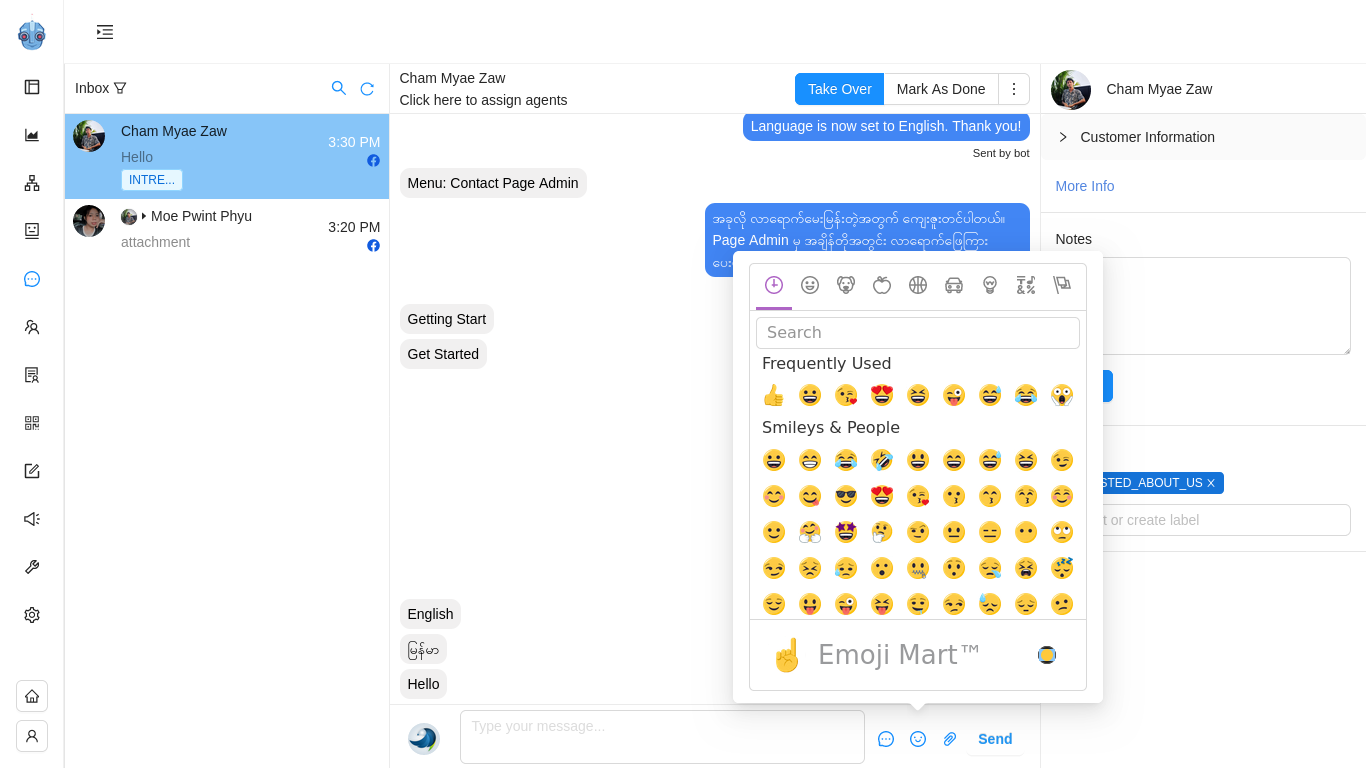
Emoji လေးတွေပို့မယ်
Facebook Inbox မှာလို Emoji တွေလည်း အသုံးပြုနိုင်မှာပါ။
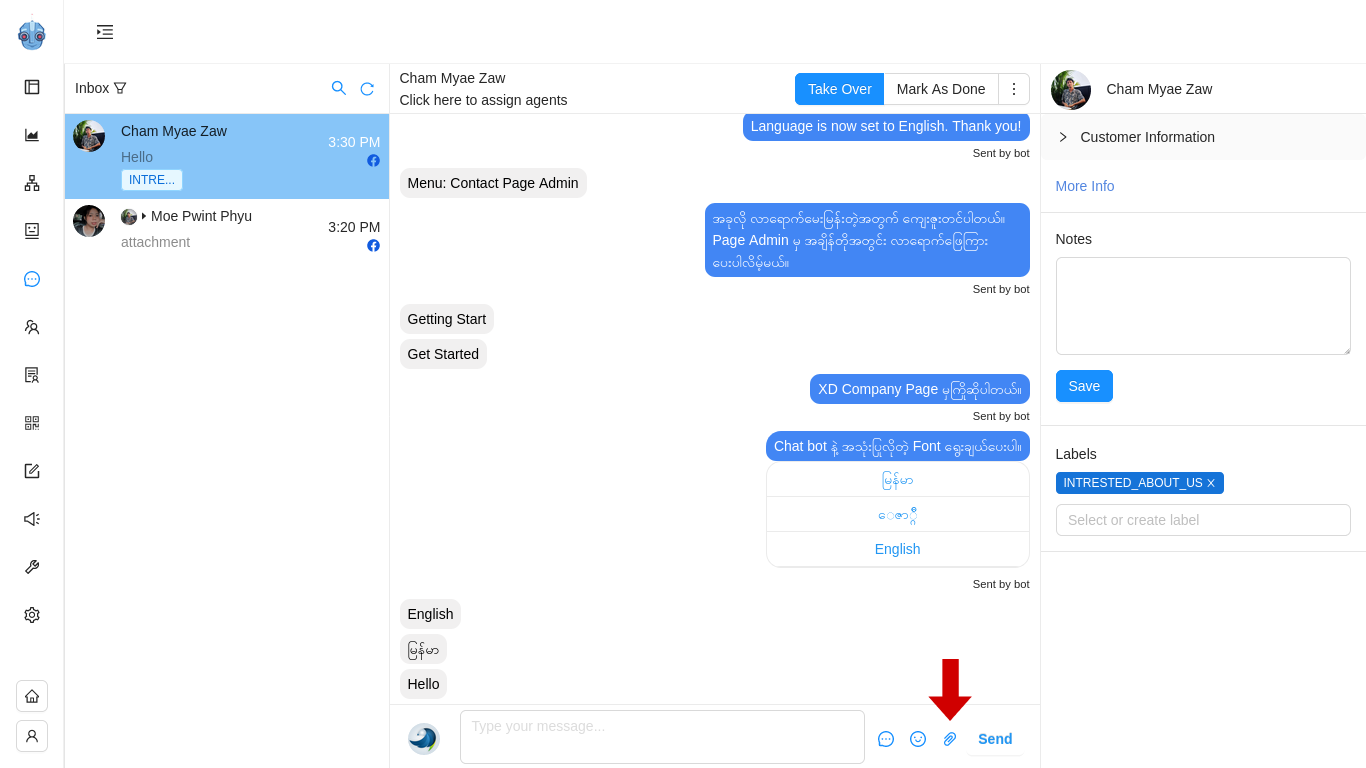
Attached file တွဲမယ်
Attached File မှာ ပုံတွေ PDF တွေ Video clip လေးတွေ စတဲ့ File တွေကို Attached လုပ်ပီးပို့ပေးနိုင်မှာပဲဖြစ်ပါတယ်။
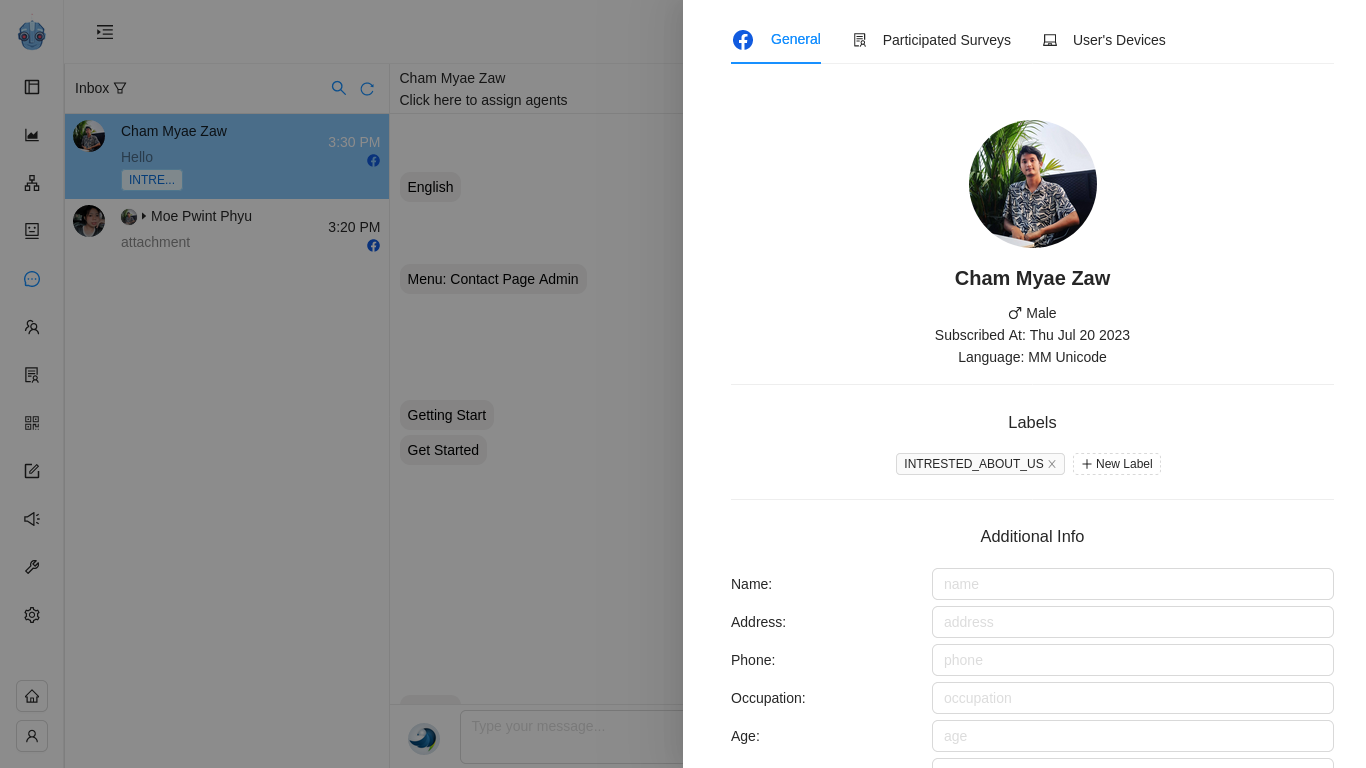
Customer Information
Facebook Info ကတော့ Customer တွေရဲ့ Facebook မှာ Privacy Public လုပ်ထားသလောက် Information တွေတွေ့နေရမှာပဲဖြစ်ပါတယ်။
General Info ကိုတော့ အောက်တွင် ဆက်ရှင်းပြပေးပါမယ်။
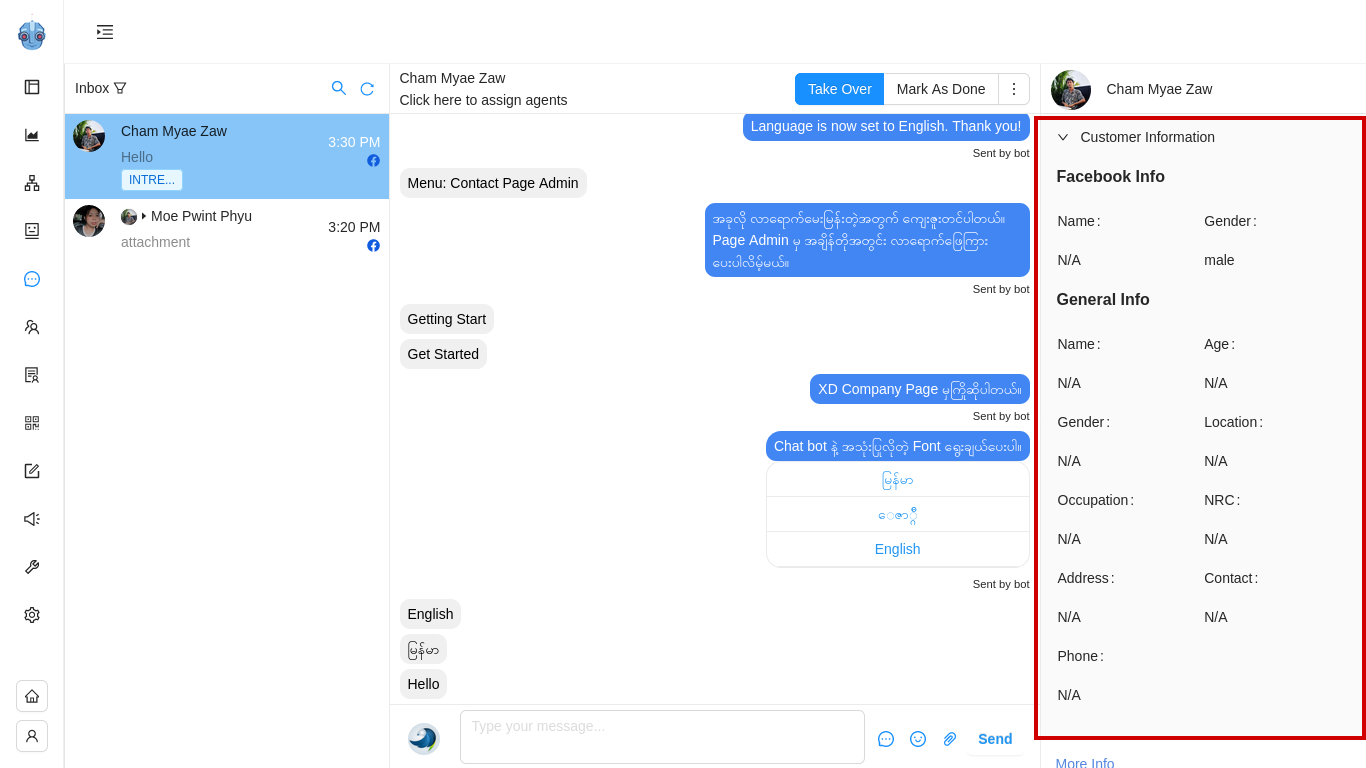
More Info ကိုနှိပ်ပေးမယ်ဆိုရင်တော့ Customer အတွက် အသေးစိတ်အချက်အလက်မှတ်တာ၊ စစ်ဆေးလိုတာတွေ လိုအပ်သလို လုပ်လို့ရနိုင်မှာပါ။

More info - အကြောင်း
More Info မှာဆိုရင် Customer’s facebook Name , Subscribed စလုပ်ခဲ့တဲ့ အချိန် , Customer ရွေးချယ်ထားတဲ့ Language နဲ့ Customer ID တွေကို တွေ့နိုင်ပါတယ်။
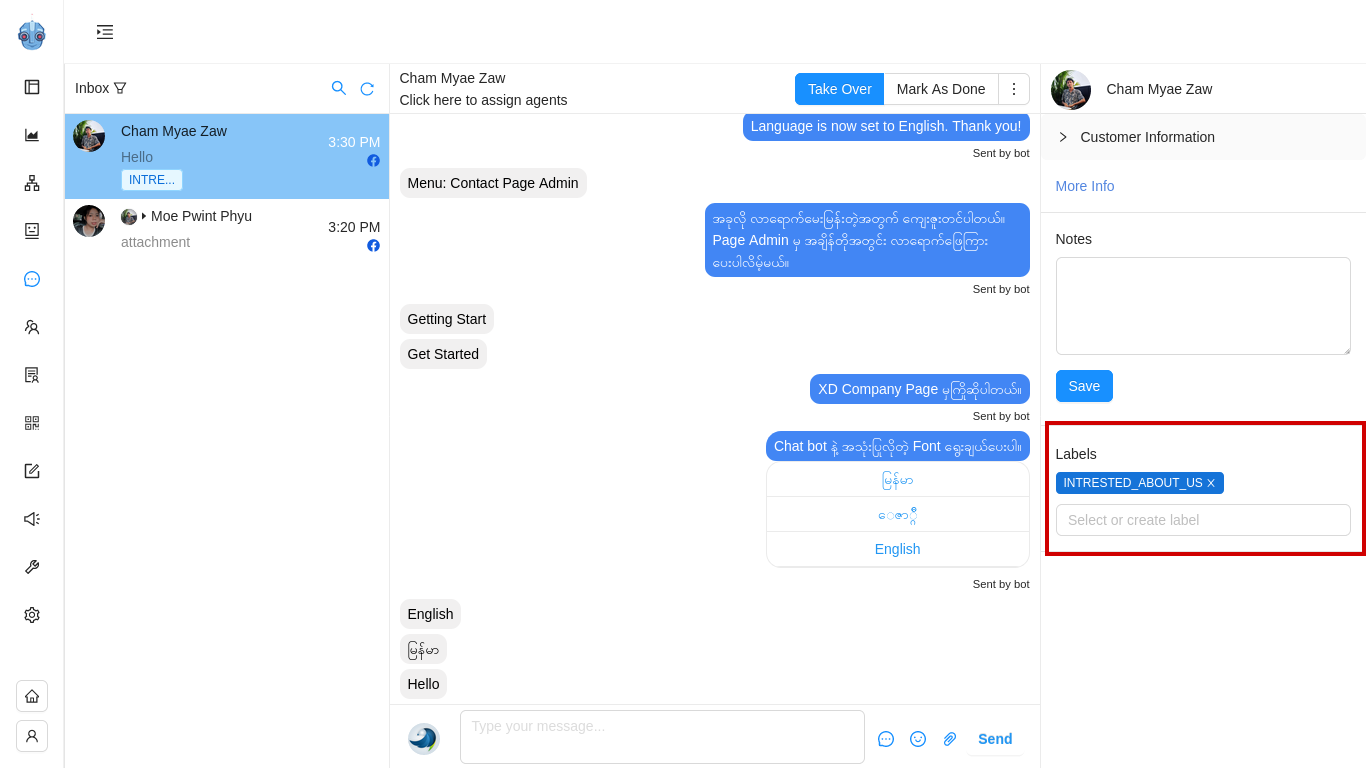
General ထဲမှာဆိုရင် Labels တွေတပ်ထားတာမြင်နိုင်မယ်၊ New Label အသစ်လည်း Create လုပ်လို့ရမှာဖြစ်ပါတယ်။
Additional Info မှာတော့ Customer အတွက် Name, Address, Phone, Occupation, Age, Location, NRC, Gender, Email ဆိုတာတွေကို Notes အနေနဲ့ မှတ်ထားနိုင်မှာပဲဖြစ်ပါတယ်။ Additional Info မှာမှတ်ထားတဲ့ Data တွေကို Customer Information အောက်က General Info နေရာမှာပြန်ကြည့်နိုင်မှာပဲဖြစ်ပါတယ်။
Survey Form ဖြည့်ထားတဲ့ Customer Data တွေကိုတော့ အောက်က Attribute နဲ့ Participated Surveys နေရာ မှာလည်း ပြန်ရှာနိုင်မှာပါ။
Participated Surveys
Facebook Page ရဲ့ Chatbot ကနေ Survey Form ၀င်ဖြည့်သွားတဲ့ Customer တွေရဲ့ Surveyအသေးစိတ်ကို More Info > Participated Surveys အောက်မှာ ကြည့်နိုင်မှာပဲဖြစ်ပါတယ်။

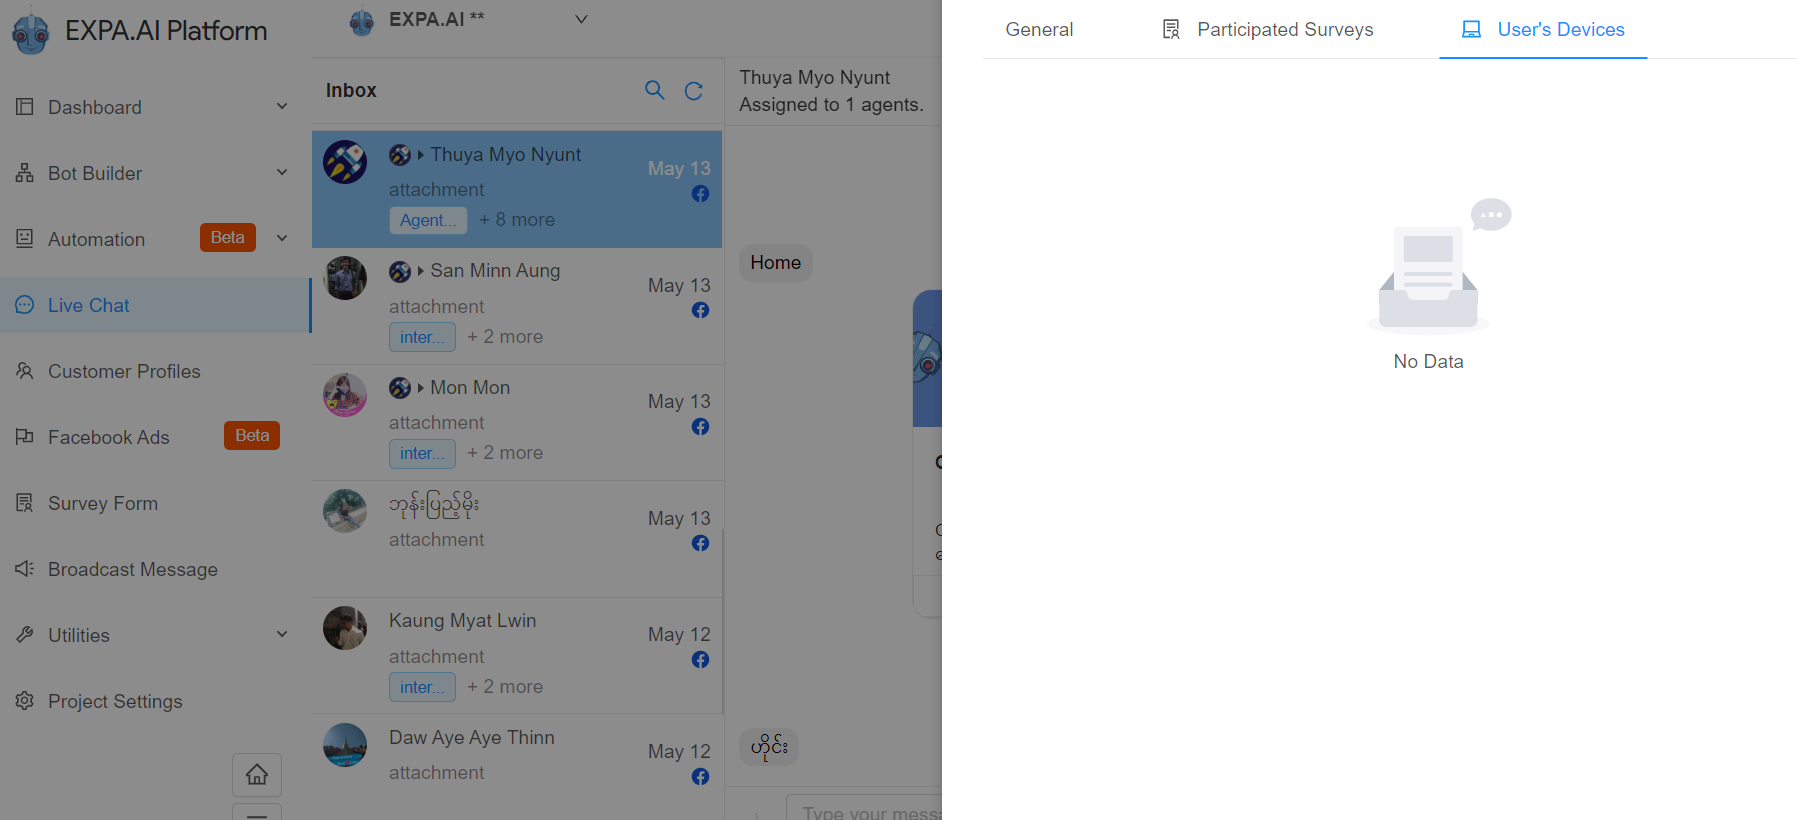
User's Devices
Customer က Bot မှာလာပြီး Survey Form ဖြည့်ခဲ့ပါက User's Device လေးမြင်နေရမှာဖြစ်ပါတယ်။ အခုက Form မဖြည့်ထားသေးတဲ့အတွက် No Data ပြနေတာဖြစ်ပါတယ်။
Notes
Customer အချက်အလက်လေးတွေကို Notes လေးအနေနဲ့ Short Text စာသားတိုတိုလေးလဲ မှတ်ထားနိုင်မှာဖြစ်ပါတယ်။

Create Labels (Manual)
Label Create လုပ်ဖို့ အတွက်ဆိုရင်တော့ ပထမဦးဆုံး Live Chat Conversation ညာဘက်အောက်နားက Labels >> Select or create Labels နေရာတွင် ကြိုက်နှစ်သက်သလို နာမည်ပေးပြီး Customer တွေကို အုပ်စုခွဲထားလို့ရပါမယ်။
Live Chat မှာ Facebook Page Manager နဲ့မတူတာတစ်ချက်ကတော့ Page မှာ Admin ခန့်စရာမလိုဘဲ Message Reply ပြန်ဖို့ သက်ဆိုင်ရာ Assign Agent တွေကို Project Setting ကနေ Roles ထပ်ထည့်နိုင်တာပဲဖြစ်ပါတယ်။